In this blog, we will guide you through the process of publishing your internal artifact to Maven Central. We will begin by outlining the necessary steps in order to provide a clear understanding of the process. Then we will delve into each step, emphasizing the key actions required at each stage.

The process involves the following stages:
- Definition of a pom.xml to include the Sonatype repositories
- Creation of the GPG key
- Permission to upload to Maven Central
- Implementation of the CI\CD process
Repository Setup \ pom.xml configuration
To comply with the Sonatype policy, your deployment components must meet a minimum set of requirements.
- License information
- Developer information
- SCM information
- Javadoc and Sources
- Distribution management
- Profile setup
License Information
It is necessary to specify the license(s) utilized for the distribution of your components.
<licenses>
  <license>
     <name>The Apache License, Version 2.0</name>
     <url>http://www.apache.org/licenses/LICENSE-2.0.txt</url>
  </license>
</licenses>
Developer Information
To associate the project, it is required to include a developers section.
<developers>
  <developer>
     <id>Natural-Intelligence</id>
     <name>Natural Intelligence</name>
     <email>devops@naturalint.com</email>
  </developer>
</developers>
SCM Information
Another requirements to include is the connection to your source control system.
<scm>
  <connection>scm:git:https://github.com/Natural-Intelligence/openLineage-openMetadata-transporter.git</connection>
  <url>https://github.com/Natural-Intelligence/openLineage-openMetadata-transporter.git</url>
  <developerConnection>scm:git:https://github.com/Natural-Intelligence/openLineage-openMetadata-transporter.git</developerConnection>
  <tag>HEAD</tag>
</scm>
Javadoc and Sources
Maven projects with packaging have to supply JAR files that contain Javadoc and sources. Including these files enables consumers of your project to easily access and browse through the Javadoc documentation and source code.
We will include two plugins in our Maven configuration:
- The maven-source-plugin is used to create a JAR file containing the source code of the project
- The maven-javadoc-plugin is used to generate Javadoc documentation for the project’s source code.
<build>
  <finalName>my-app</finalName>
  <pluginManagement>
     <plugins>
        <plugin>
           <groupId>org.apache.maven.plugins</groupId>
           <artifactId>maven-source-plugin</artifactId>
           <version>2.2.1</version>
           <executions>
              <execution>
                 <id>attach-sources</id>
                 <goals>
                    <goal>jar</goal>
                 </goals>
              </execution>
           </executions>
        </plugin>
        <plugin>
           <groupId>org.apache.maven.plugins</groupId>
           <artifactId>maven-javadoc-plugin</artifactId>
           <version>3.5.0</version>
           <executions>
              <execution>
                 <id>attach-javadocs</id>
                 <goals>
                    <goal>jar</goal>
                 </goals>
              </execution>
           </executions>
        </plugin>
     </plugins>
  </pluginManagement>
</build>
Distribution Management
Here we provide information about the distribution management configuration, including repository URLs for snapshots and releases.
<distributionManagement>
  <snapshotRepository>
     <id>ossrh</id>
     <url>https://s01.oss.sonatype.org/content/repositories/snapshots</url>
  </snapshotRepository>
  <repository>
     <id>ossrh</id>
     <url>https://s01.oss.sonatype.org/service/local/staging/deploy/maven2/</url>
  </repository>
</distributionManagement>
Profile Setup
Then we will define profiles that can be activated under specific conditions, such as for continuous integration or specific environments.
We will include three plugins in our Maven configuration:
- The Nexus Staging Maven Plugin is facilitated the deployment and release of artifacts to a Maven repository, specifically the Sonatype Nexus repository.
- The Maven Release Plugin is facilitated the release management process by automating versioning, tagging, and deployment of artifacts to a repository.
- The Maven GPG Plugin is used for signing the project’s artifacts with GnuPG .
<profiles>
  <profile>
     <id>ci-cd</id>
     <build>
        <plugins>
           <plugin>
              <groupId>org.sonatype.plugins</groupId>
              <artifactId>nexus-staging-maven-plugin</artifactId>
              <version>1.6.13</version>
              <extensions>true</extensions>
              <configuration>
                 <serverId>ossrh</serverId>
                 <nexusUrl>https://s01.oss.sonatype.org</nexusUrl>
                 <autoReleaseAfterClose>${env.AUTO_RELEASE_AFTER_CLOSE}</autoReleaseAfterClose>
              </configuration>
           </plugin>
           <plugin>
              <groupId>org.apache.maven.plugins</groupId>
              <artifactId>maven-release-plugin</artifactId>
              <version>2.5.3</version>
              <configuration>
                 <tagNameFormat>@{project.version}</tagNameFormat>
              </configuration>
              <executions>
                 <execution>
                    <id>default</id>
                    <goals>
                       <goal>perform</goal>
                    </goals>
                 </execution>
              </executions>
           </plugin>
           <plugin>
              <groupId>org.apache.maven.plugins</groupId>
              <artifactId>maven-gpg-plugin</artifactId>
              <executions>
                 <execution>
                    <id>sign-artifacts</id>
                    <phase>verify</phase>
                    <goals>
                       <goal>sign</goal>
                    </goals>
                    <configuration>
                       <gpgArguments>
                          <arg>--pinentry-mode</arg>
                          <arg>loopback</arg>
                       </gpgArguments>
                    </configuration>
                 </execution>
              </executions>
           </plugin>
        </plugins>
     </build>
  </profile>
</profiles>
You can find the reference code for the complete pom.xml file in the following link.
GPG Setup
To publish your artifacts to the Central Repository, one of the prerequisites is to sign them using PGP.
Let’s refer to the following steps:
- Download and install the gnupg
- Generate a key
- Define a key expiration
- Distribute your public key
An example using mac:
# Download the GPG Suite
curl -sSL https://releases.gpgtools.com/GPG_Suite-2023.2.dmg >> GPG_Suite-2023.2.dmg

# Install it
./GPG_Suite-2023.2.dmg

# Generate a key
gpg --gen-key

# List your key
gpg --list-keys

# Define a key expiration
: '
  Press 1
  Type expire
  Type the expiration Months\Years
  Type save
'
gpg --edit-key <Your Key - You Can Get From The Command Above --list-keys>

# Distribute your public key to a key server
gpg --keyserver keyserver.ubuntu.com --send-keys <Your Key - You Can Get From The Command Above --list-keys>
It is important to securely store and remember your GPG passphrase.
Permission To Upload To Maven Central
To publish to Maven Central, you are required to create an account on Sonatype Jira and initiate a new issue for the registration process. The new Jira ticket will trigger creation of your repository.
You can follow the progress of the issue I created for this blog.
Ensure that you fill the fields accurately, especially the Group ID. In my example, the Group ID is io.github.naturalett
Additionally, it is possible to create distinct group IDs based on the company’s domain or opt for a GitHub-based approach, as demonstrated in this example. Detailed instructions and information can be found in the comments provided by the bot within your Jira ticket.
To complete the process, you should proceed according to the instructions provided by the bot, including creating a GitHub repository to verify your ownership of the GitHub account.
Setting Up GitHub Actions for your CI/CD pipeline
Before proceeding with the pipeline, there are several actions we need to take to enable artifact signing and uploading to Maven Central.
Here are the steps that you need to take:
- Export your GPG private key
- Create a Github secrets
First, we will export our private key. This private key is required in order to sign our artifact during the pipeline build.
gpg --armor --export-secret-keys <Your Key - You Can Get From The Command Above --list-keys> > private.gpg
Next, we will proceed to GitHub secrets in order to create the following secrets:
- MAVEN_GPG_PASSPHRASE — Your passphrase that you used to create your GPG key
- MAVEN_GPG_PRIVATE_KEY — Your private key that you just created
- OSSRH_USERNAME — Your username in Sonatype
- OSSRH_TOKEN — Your password in Sonatype
To create Github secrets, you can navigate to the following location:
Settings -> Secrets and Variables -> Actions.
Our CI/CD Pipeline Structure

In our CI/CD pipeline, we have defined the following steps:
- Checkout — of the repository using actions/checkout@v2
- Initialization — of Java using actions/setup-java@v3
- Configuration — of git user using bash commands
- Configuration — of the GPG key using crazy-max/ghaction-import-gpg@v5.0.0
- Verification — if to create a release using bash commands
- Build and Deploy —Uploading the artifacts
The reference code can be found here.
What is the process of releasing a version to Maven Central using the Github Action Pipeline?
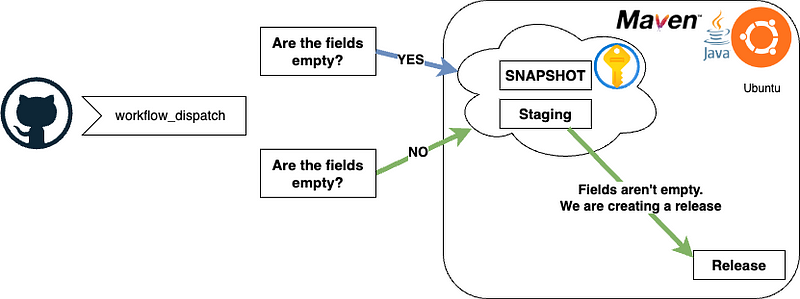
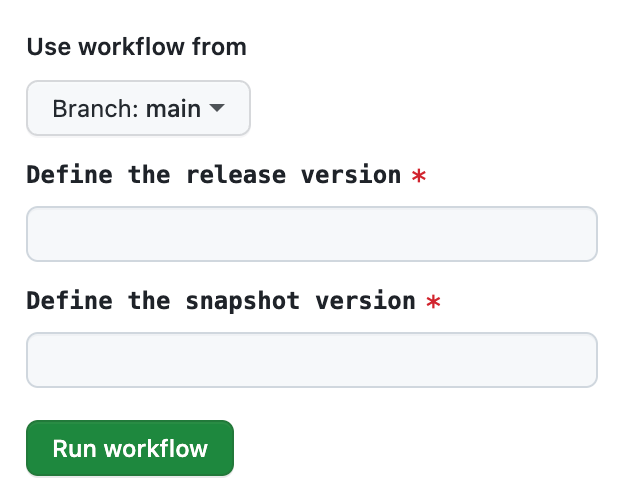
In our pipeline, we have included a workflow_dispatch event. The purpose of this event is to allow the user to initiate the release of a version to Maven Central. This means that users can use it to select and release a specific version.
Below is an example of what you will find in your Github Action. For instance, if the current version in your pom.xml file is 0.2.128-SNAPSHOT, the release version that you will fill is 0.2.128, and the snapshot version will be 0.2.129-SNAPSHOT.

Next, the pipeline will check if you have initiated the release by using the ‘Verify whether a release is ready’ step. In this step, we check if the user has triggered the release, and if so, we export the ‘auto_release’ parameter to the environment variable.
The autoReleaseAfterClose attribute key in the pom.xml file indicates whether the artifacts should be automatically released after the staging repository is closed. We have assigned the attribute value as AUTO_RELEASE_AFTER_CLOSE, which is obtained from the earlier steps in the pipeline.
If everything goes as planned, you will be able to view your artifacts as follows:
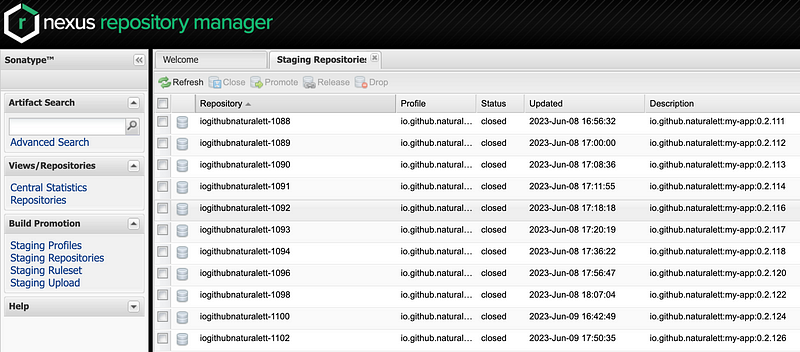
However, if you do not initiate a release while using the workflow_dispatch event, the pipeline will only create a SNAPSHOT version and a closed Staging version. It will be up to you to manually release the Staging version when you are ready.
To manually release the Staging version, you will need to log in to the Nexus Repository Manager.

Summarize
In this blog, we have learned how to:
- Configure the necessary settings in the pom.xml file
- Set up GPG for artifact signing
- Obtain permission to upload to Maven Central
- Create a CI/CD pipeline using GitHub Actions
By following to these guidelines, we can optimize the process of publishing our internal artifacts to Maven Central, effectively sharing them with the broader developer community. This brings several advantages, including simplifying the deployment process, ensuring compliance with Sonatype’s standards, and automating the release management tasks.
For additional code references, you can find the full code in my GitHub repository:
https://github.com/naturalett/maven-hello-world/tree/main
If you are looking to level up your DevOps skills and dive into the world of continuous integration with Jenkins container pipelines. Enroll in my comprehensive course to gain hands-on experience in real-world pipeline scenarios and develop mastery in production skills. Take the first step on your journey to become a DevOps expert and unlock the potential of CI and Jenkins container pipelines.
Hands-On Mastering DevOps — CI and Jenkins Container Pipelines