Learn how to deploy Squid Proxy on AWS Fargate for outbound traffic management, automatic IP rotation, and secure access control
Squid Proxy can be your tool for managing outbound traffic in AWS. It offers features like anonymity, IP rotation, controlled access and more.
In this article, we’ll guide you through the process of achieving:
- Predictable IPs — Attach an Elastic IP (EIP) to ensure all outbound requests originate from a fixed, consistent AWS IP address.
- Dynamic IP Rotation — Deploy multiple Squid instances behind an AWS Network Load Balancer (NLB) to automatically distribute traffic across different IPs.
- Basic Authentication — Restrict proxy access to authorized users only.
🚀 Key Advantages of Squid Proxy 🚀
Beyond IP control, Squid Proxy provides several benefits:
- Content Filtering — Block specific websites or content types based on predefined rules.
- Access Control — Restrict unauthorized applications from reaching malicious or unnecessary websites.
- Caching for Performance — Improve response times by caching frequently accessed resources.
- Cost Reduction — Reduce bandwidth costs by serving cached content instead of repeatedly fetching it from the source.
🚀 Architecture Overview — Step by Step 🚀
- At first, we will build and run a local docker of the squid-proxy so you can test locally the solution.
- Then, we will deploy Squid Proxy containers using Amazon ECS on Fargate, which eliminates the need to manage EC2 instances or auto-scaling groups manually.
- Next, we will expose the proxy service, by configuring a Network Load Balancer (NLB), which ensures high availability and efficient traffic distribution.
- At last, we will enable automatic IP rotation by integrating an EventBridge scheduler, which triggers a new deployment at predefined intervals. This ensures that each Squid Proxy instance receives a randomly IP without manual intervention.
Before we begin, let’s clone the following repository which will be used in our solution
git clone git@github.com:naturalett/squid-proxy.git
Build and test a Custom docker of Squid Proxy
Let’s build a Docker image for our Squid Proxy with a custom configuration stored in squid.conf. As well, for a secure access we will enable authentication by creating a username and password so we can be assured that only authorized users have access to the proxy.
cd squid-proxy/docker
docker build -t squid:ssl-passwd -f Dockerfile .
Let’s test our docker image but first let’s run the container and bind the port to 3128 :
docker run -d --name squid-container -it -p 3128:3128 ssl-passwd
Try to hit the squid proxy:
curl -I --proxy http://localhost:3128 https://www.google.com
You might crash into the following error:
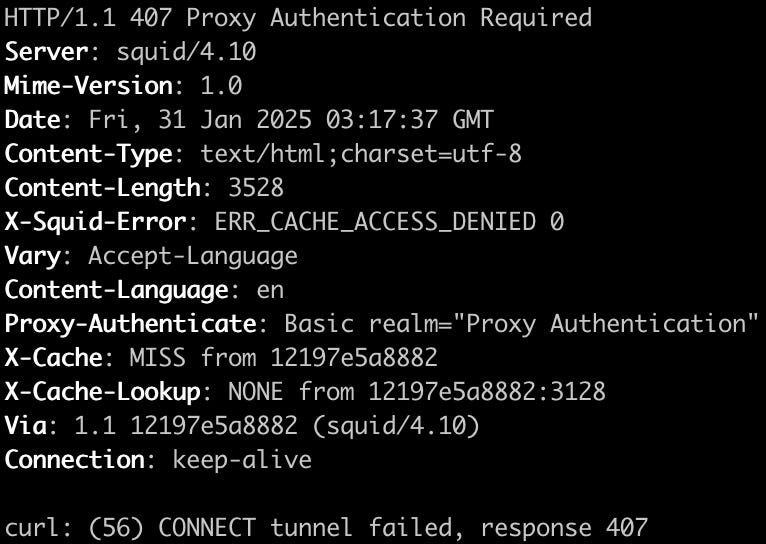
Now try with the username and password that we set up:
curl -I --proxy-user admin:test --proxy http://localhost:3128 https://www.google.com
You should get 200 and the following output:

To ensure that your Docker image is accessible during the ECS deployment, you need to upload it to your ECR repository. You can refer to the documentation here for detailed steps.
Deploy Squid Proxy containers using Amazon ECS on Fargate
The Squid proxy service runs on AWS Fargate with Amazon ECS, operating a fleet of proxy servers behind a Network Load Balancer. The container image running the Squid proxy includes the squid.conf configuration file, which, along with other customization rules, can be managed through a Git-based repository.
The Network Load Balancer used by ECS is set up as an Endpoint Service. The endpoint service can be configured to grant specific AWS accounts access to the central proxy. Additionally, a private DNS name can be assigned to the endpoint service, allowing accounts to use a unified hostname for the proxy.
Our setup ensures that hosts and applications across different accounts and VPCs can connect using a consistent proxy hostname, which resolves to the local endpoint within each VPC.
Let’s deploy it:
cd terraform/services/squid
terraform init
terraform plan
terraform apply
Recap
The deployment process will generate the nlb_dns_name, which should be added as a CNAME record in Route 53 to route traffic to the Network Load Balancer. Once the deployment is complete, the NLB will distribute traffic to two running containers in Fargate. Additionally, an EventBridge schedule is configured to replace these containers every five minutes, ensuring a continuous rotation of IP addresses.
Stay tuned for more DevOps content! 🚀